Wednesday, January 20, 2016

Silky (sort of) beancurd desert: Tau fu fah


Honey its cold outside.....
 This is one sweet desert I have been trying to make since last year. I can never find the main coagulant ingredient here. But ever since I got GDL from home, well more like importing it in, I was itching to try it out. As usual life happens and I never could find the time to make my own soy milk until last Sunday, when its starting to snow and it was near freezing. To top it off, I was craving for this desert! :) 

Bacon wrapped scramble eggs topped with chives & *sheet of brick

I found several TFF recipe but they are always in Chinese or using gypsum powder (the food grade one mind you, not plaster of paris). And as most of them are imported from China, I get very vary of Mainland products ever since the milk powder scandal. I finally found this blog by WendyinKK @Table for 2 or More. I was over the moon when mine FINALLY SET after anxiously waiting for it. OK, not that anxious-lah! We went out for a walk (a long walk) once it kinda stop snowing outside for a while. 
First edible TFF! :D 

I've made my own soy milk for many times using my soy milk maker. But this time I decided to forgo using the maker as its rather troublesome. It can only load about 50g of soaked soy beans at a time. As I am a major pain in the a** about cleaning my electrical appliances, I need to clean it out. Blame it on my OCD. :p 

I like it with palm and ginger syrup. Yummy! 
I have to admit, my TFF was not as smooth looking as hers is. Perhaps I did not grind the beans as it should. I was using my Moulinex blender and cloth strainer to get the job done. I will try again next time, perhaps using coffee filter and when I find the motivation to skin all those soaked beans. :p I find that removing the outer shell of the beans makes soy milk tastes better. 

*Sheet of brick is feuille de brick in French. It is similar to popiah skin BUT its not the same. They are slightly thicker in texture. It will get crunchy in the oven minus the use of oil. BUT they will burn easily if oven temperature is too high or you leave them in for too long. They come in each sheet separated by some sort of waxed paper. Which makes my life easier when it comes down to peeling off each sheet without holes or tears compare to popiah skin! :) 

Thursday, January 14, 2016

In the works

Happy January 2016! My first post for the year, albeit a little late but better than never. :) So for this first blog post of the year, I've decided to continue to my cross stitch piece. I started this mid December 2015. Got this idea of actually making a fabric cover for my sewing machine. I figured that having just a plain cover can be easy and fast to make, but have I ever taken the easy route to making anything? So far NO! LOL.... 

Drafted the chart pattern after having browse through the WWW for the right image (copy right free) and letters for several hours when the kids were in school. Best time to do get things done during the day time. ;) I am not at liberty to reveal the whole piece yet. So for now its just a really small part I am willing to show. 
Using the lovely DMC Colour Variations# 4025.  

As of right now I've drafted the pattern out for the cover but I have yet to cut anything out until I am 100% sure I've got the calculations correct. Novelty print fabrics are hard to find here in the Land of Moos, not to mention mighty expensive! Reasons why I "import" them via online shops, when I am back at my parents' place or other relatives'.

Speaking of which, I'm on a forced stash diet for the moment until I can sort of "thin it out". :p Its horrible but its a necessary evil. Let's see how long I can stand it this year. Can not promise that I might not break the diet.


Monday, December 28, 2015

And the countdown begins!

Full moon snow shoeing with girlfriends. :)
Yup! Its almost THAT time of the year where its almost ending but not quite. For some, its the time of the year to reflect on what we had achieved or not. Facebook even has this "year in review" thing, in which photos posted with the most comments or likes get picked up. 
Solar eclipse from tissue box viewer. :p
I've seen my "year in review". Its so strange to see them all happened in 2015! ;) Since I can only choose 10 photos out of the many (MANY) photos I've posted, it was really difficult for me to pick and choose. Because all these photos and memories are very significant for me. So asking me to just pick the 10 is out of the question. :) 
Strawberry picking season June 2015
So what can I say about this year? I know I had tremendous fun time with my 2 little guys and hubby. Made lots of yummy meals in that cramp work space in my kitchen. Had the experience of the lifetime; snow shoeing at night during the full moon of CNY period. Also how NOT to get myself killed while snow shoeing! LOL... Saw the Solar 2015 eclipse with home made viewer.  
Lo mai kai fan comfort food....

Spent the late spring time picnicking/barbecuing and swimming in the lake with friends. Went home during the summer time, in which we had a wonderful time spent with family and friends; swimming with the fishes, playing by the sea, enjoying yummylicious food and most of all connecting with people.
Tioman Island summer of 2015

All in all a rather positive year for me. Oh sure there are sad and negative moments as well, but seriously? I just don't see the point on dwelling on them. There are also some things I did not get around doing it also this year. There's always next year and I am not going to feel sorry for postponing it. 
Knights fabric wallet for O.
In that note, I am going to make myself 2 list; one with datelines and one without datelines, for the things I'd like to get done for 2016. I can't help but wonder this time around next year, how much I would have accomplished. Guess we'll just have to wait and see. :) 

Tuesday, December 22, 2015

Life happens!

Half circle wrist pouch as year end teachers' gifts, 2013
Its been a while since the last time I'm posting any thing new. The last one was in  June 2013! Gosh! Oh well I am not going to beat myself up for it. As with anything and everyone, life happens and I am not going to spent it regretting not having written about it. 
Sitting pretty pincushion 2013
More fun felt hair clips for a return customer , 2014
So here's the round up what has come to past. From end of summer of 2013, we saw our older boy gone on to year 3 (equivalent of primary 1 M'sian school system). We were all super excited about it. But in the end it was a pretty tough times for him and us as parents. For 2 years we were struggling together with O facing his class teacher (that women clearly needs help!) and other issues, namely behavioural and hand writing. We were at wits end and it was already too late to change class. This issue was also affecting my relationship with the kids and hubs. However I was glad that we seek help from the school appointed "psychomotricienne" or psycho motor therapist for his fine motor skills. At one point we were sort of being "forced" (by the class teacher) to seek help from the schools' child psychiatrist! In the end of his sessions, the school psychiatrist told us O was well adjusted kid, and she finds that he may even be on the high side of average child with same age on intelligence! Clearly the previous class teacher needs to see a shrink more than O. Grrr....  

Was a pain making these for CNY in 2014 but the final results was oh so delicious! LOL...

Celebrating CNY and a birthday goodies box 2015. 

I was glad that I am surrounded by supportive mummy friends. If not for them, I don't think I am able to stay sane for long in dealing with that lady. ;) Although we applaud her for her teaching methods, (O was reading books by the time he finishes the 3rd year!!) but we do not appreciate her for her forms of punishment. Things are more smooth sailing now for O. Thank goodness! The boy has more confidence, behaves better and are more joyful since starting the new school term with a new teacher. 

Quilted storage fabric boxes 2014.
As for our youngest guy, 2013 see him wanting to join into everything big brother is doing. Thus causing more frequent disputes between them. End of summer 2014, K went to 1st year in school. He was super happy to be FINALLY growing up! LOL... School hours was a bit tough on him during the first 3 months as he was pretty much too tired for school after lunch. Several times he fell asleep during story time or class activity as he still needed his afternoon nap. This time around, for 2nd year, the fellow is faring much better. :) Although I can not say the same for his mischiefs and his idea of fun at times, at the very least I can say he is still learning how to be a better little brother by not hitting big brother when they disagree. ;) 

Finished 2014 Christmas presents for friends :)
AAAARRRRR!!!! K's Pirate Quilt.
As for me, craft wise.... Managed to plan and finish a 140cm x 200cm Pirate theme quilt for K. This was done after having been pestered by the little guy every day when he is able to use it, while the process was still on going. LOL... Most of the quilt materials was gifted to me by wonderful stitching friend across the Atlantic. All I had to do was just get some extras and finish it. The process was long, frustrating at times due to having some issues with calculations/cutting of fabric and of course my share of frogging the pieces of appliqué at one point. In the end I was really happy with the result. 
One of my first wearable project 2013. Pillowcase dress for a friends' daughter.

My next quilt project is going to be for O. I already have almost all materials, just so far not the courage to start it. :p I also actually started a quilt along with a group of friends at NNC, the Postage Stamp quilt. It got to a stage where its in blocks But I have no idea on how to actually arrange it to my liking. So that is now an UFO until I get inspired on how to arrange the blocks and do the finishing for it. 
First time making kimchi too 2013 fall stock! :)
2015 Waist apron project. Photo courtesy of happy customer. :)

So for now it will be just going back to my cross stitch. How I missed it. Am almost done for the piece on my sewing machine cover. It will be a surprise and I am really excited to get to the cutting and sewing part. Not so much for figuring out how much fabric part. LOL...

So here's hoping that I will continue to blog as and when I can in 2016, making wonderful memories and beautiful items for people to enjoy. :) 


Friday, June 14, 2013

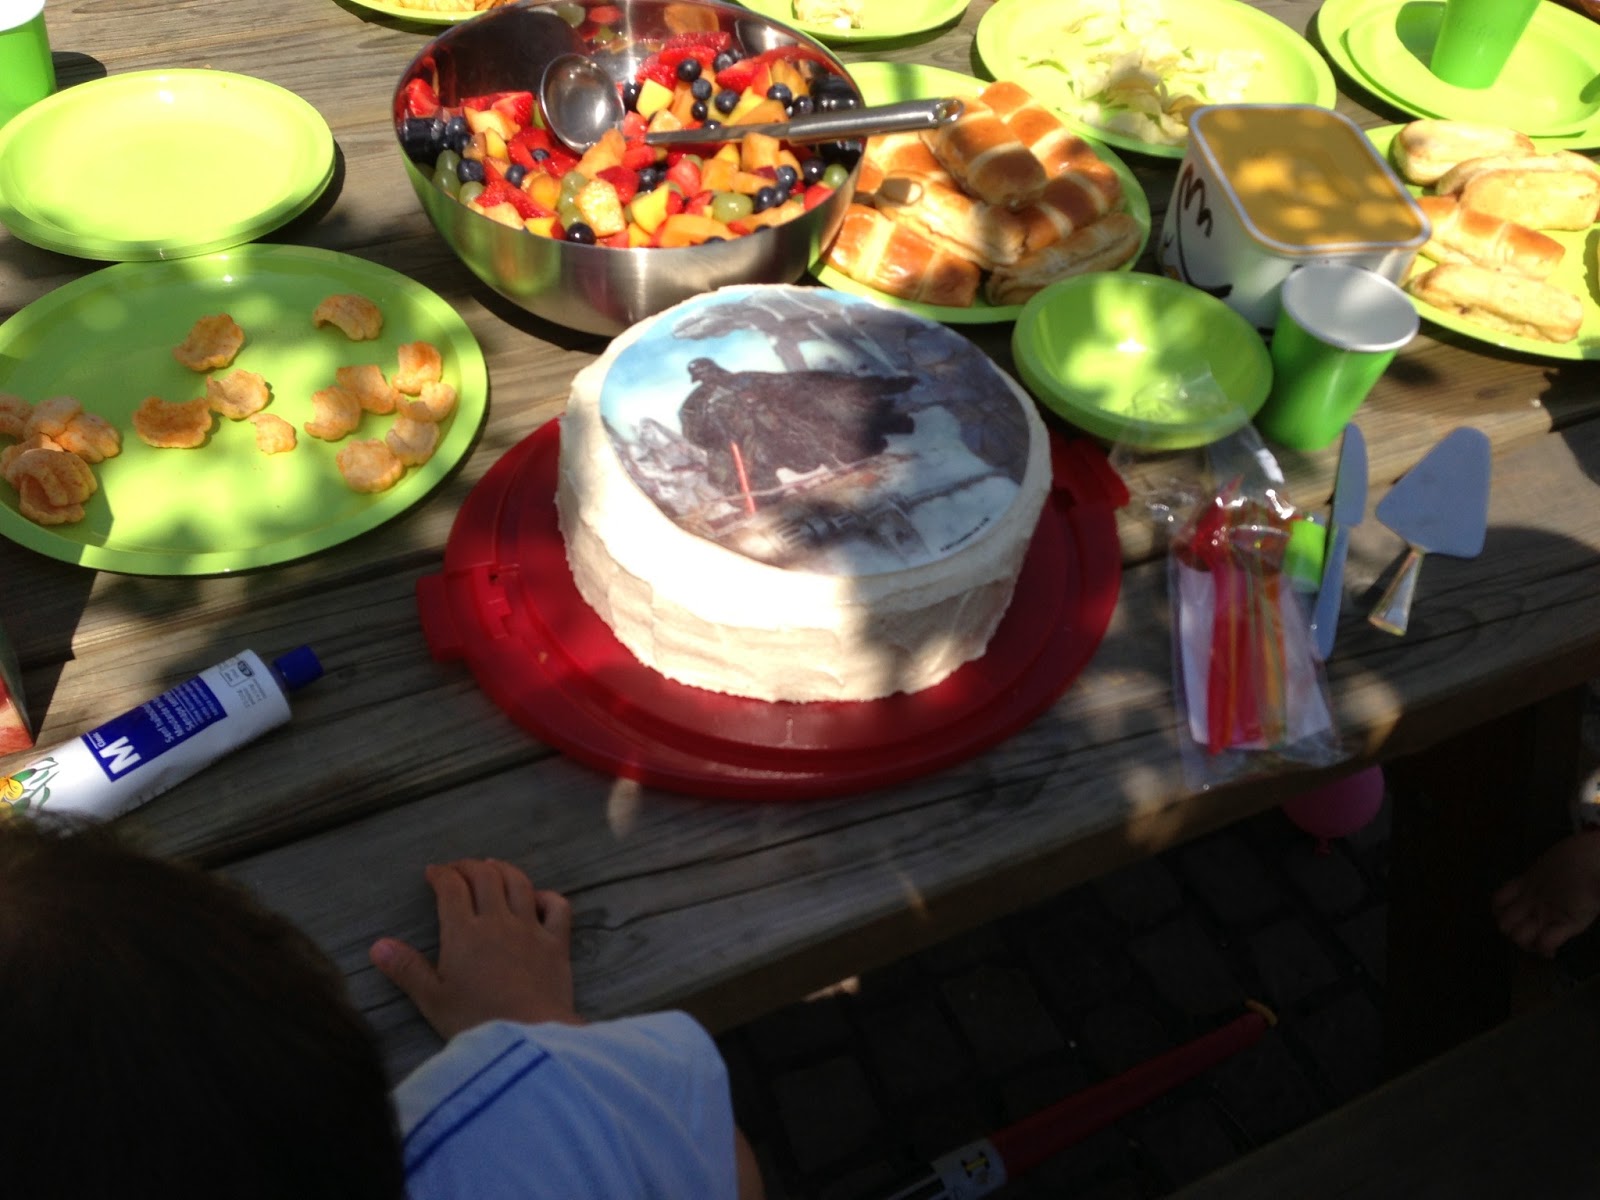
O's 6th Star Wars birthday party! YAY!

I still can't believe that my baby boy who seemed to have been born yesterday is already 6!! In fact I am still refusing to believe how time just flies by and how grown up my babies are now! Sigh... 

Any how we did a big bash for him this time with some of his school buddies and other friends we know. This goes without saying, we thank the heavens above for giving us such a beautiful, sunny and HOT day for O's birthday do. I really don't know what I'll do if it had rained! Imagine 10 plus boisterous boys running about in a tiny apartment!?! It will take more than a vintage bottle of wine to cool things down mentally! hahahahahaha.... 
The actual cake with edible Darth Vader cake deco.
Not seen here is the very cool Darth Vader candle holder.
OK, digressions aside. This time birthday boy decided on a Star Wars theme after many mind changing and lots and lots of convincing on my part. You see, I grew up on Star Wars and Star Trek series. Call me a nerd but those shows are classics! That's why it is easier to get party supplies under popular culture themed parties than obscure ones. 

After Googling Star Wars party after Star Wars party ideas, I've finally settled on just making some gifts, the piñata and the cake myself while the rest are bought online. Living in Switzerland can be great sometimes but this country is the WRONG country to live in for a craft. Sigh... 

The gifts That I made was a Star Wars colouring book (complied, re-sized and sew binding), a Jedi "summer" robe, character masks and foam "light sabre". The light sabre I could have bought on line which is glow in the dark types but what fun could it bring during the day time? Yes it is a cool (REALLY COOL) item but still it costs to much to get for each kid. 

Foam light sabre was made from pool noodles. You know the kind that people use (mostly seniors - no pun intended!) for aqua gym? YUP! Those costs about 10 freaking buck here and just over 2 on the other side of the boarder. Can you believe that?? Geezzzz..... And the silver handle was just wall deco sticker and black pipe tape from a hardware shop. Pretty fast and easy to finish up. 

Piñata stick in the making. 
Next the piñata. Was time consuming as I had to let dry each layer before putting on the next. The last piñata  I made was a Piston cup (from CARS cartoon) 2 years ago and that thing caused the "death" of an iron rod! LOL! Talk about a tough cookie! So this time round, I made sure the layers are half of the last piñata and made sure that we got a really solid stick to bash it. I know, I could have save myself the trouble and just bug the damn thing. But to me paying either CHF44 of the head of Darth Vader of CHF28 for a football piñata (then paint it into a Death Star) for it to be DESTROYED later on doesn't make sense. So a Death Star piñata was born, sort of... :p And the really solid stick was also from a hardware store, just decorated with crepe paper and silver sticker. 
O's 4th do. Notice the OVERLY SOLID "Piston Cup" piñata on the back ground?
Well, it was no match for the iron rod! :p
Not so hard as rocks "Death Star" piñata. Be kind, that's my 1st Death Star! 
Red Sabre and Death Star
The Jedi summer robes, got this idea off one of the mummy blogs. But her's were made out of faux leather, thus no sewing required. And since her party was held during the colder months, it does not make sense to make the kids sweat themselves even more than they are already with the running about in the heat. So off I went to get cheap cottons from the shops here. Then it was cutting, zig zagging the sides and making the "belts". Made them in various sizes as well. BUT if anyone is attempting to make this in fabric, be warned that it will FALL OFF while running about and sabre fights due to it being light weight. That's when I pinned the top neck area together with their t-shirts with a safety pin on each boys who wore them. 

Strawberry cake test. Was so YUMMYYYYY.... 
Last but not least the CAKE! What birthday would it be without a CAKE?? :) The boy requested Strawberry cake and so he did received one made out of real strawberries not one of those cake mix or Jello thingy. Recipe is here if anyone if interested. Just a side note; make this cake using the normal method you would make a cake with. You know, beat butter/margarine with sugar till fluffy, then add the eggs, then mix the wet ingredients alternate with the dry and bake as per recipe. The last time I followed this recipe to the letter, the whole cake was GUNK! BIG TUMMY DISAPPOINTMENTS! 
These plain cupcakes & Lego mini figurine packs were  for O's class
Made the cake twice as the 1st time as into cup cakes to share with his classmates at school. I bought digital printable of Star Wars themed cup cake liner & tags and invitations from Etsy.com. Love this place! 

Vegan Whipped Cream tests with Strawberries. Very YUMMY! 
As we were having a kid with dairy allergy over (talk about living in the wrong country being dairy intolerant!), I had to search for frosting which is dairy free. Found one I like after tasting it out on hubs - the official taster in the family. :) This cream is to DIE for, unless of course if you have nut allergy, then it is a no go. Recipe is here if you'd like to try it out. Side note about this recipe; LOVE IT! It can be made either as soft or firm whipped cream. I made firmer whipped cream and it sort of stayed on for several hours out doors under the shade and the cream did not "slipped off" or "seep into" the cake even though it had become softer. Very happy with the results. This cream goes GREAT with berries/ice-creams or just eat out of the container with finger/spoon. :) 

Next up: the actual do. :) 


Velvet ribbon cushions

I have been pretty occupied these past few weeks. Was at first busy with NNC Anniversary gift exchange and the Fabric House Challenge . Then up next was a cushion cover I sort of promised a friend; a velvet ribbon weave cushion cover. And finally O's 6th Star Wars themed birthday party.

The cushion covers. :) Happy with the results! 
And as promised to a friend back home, here's an over due write up of the cushion cover. When my friend and I saw it in one of my many craft books, we immediately said YES! This is the one!. It just look so simple and easy to do. Little did I know it was FAR from it. Yes the technique is not something very new. But try to do this on velvet ribbons that sort of bow in a certain way and are so stubborn to stay in its place.
A closer look at the mix sized ribbon weave. 
After much fussing and hand hemming, the ribbons did stay put during the sewing up process which took me several hours just to get the pipping right at the edge like it should be - meaning more frogging in some places. But the end result was better than I've expected. :) The first cushion I decided to use only one size ribbon and the second one was made using mix size ribbons. I preferred the mix as it gives it the cushion a new look all together.

Well if I ever wanted to make another cushion using this technique, I'll be using jacquard or cotton ribbons instead of velvet ones due to the price and also easy care with the kids! LOL! Plus I'll make real sure that the ribbons aren't bowed and are straight as it should be. Lesson learnt eh? :)


Saturday, April 20, 2013

NNC 6th Anniversary and book marks exchange

I have kept this rather nice and tight until now. :) Just today my stitching group Needles n'Craft had our 6th anniversary meet up at Sabariah's home - whom has been so generous to offer her place to host this event for the 2nd time. 

The NNC Fabric House Challenge "neighbourhood".
Just look at all the pretty houses! 
For this year, Margaret (our resident headmistress) has come up with a challenge for those who participated in the Anniversary Gift Exchange - Fabric House Challenge! :) Each participant has to "built" a house using nothing but fabric and as for decorations, well I guess it is anything goes. For this year, as with previous years, members would complain and complain, stress each other out but finally when D-day comes, each item made would be as cute and as pretty as the next one! hahahaha... That's how we roll! ;) 
My wonky house.
PS: Silly me I have FORGOTTEN to take photos of it . So this is from the group's photo file... :p

For my house, I saw something I like from Molly Chicken and I scaled it up a little bit bigger. Got to use this new (to me it is new) batting call Soft & Stable by Annie, to test it out as I've read so many good reviews from bag makers and quilters alike. I quite like the texture and it is pretty sturdy looking judging from when I made seat backing on this very pretty pincushion bellow. 
Pattern from Heirlooms by Ashton House
By the way, this pincushion is made for NNC anniversary gift exchange. Isn't it pretty? I will make some more of this but perhaps in another shape. Making this pincushion was a PAIN!! LOL! I guess by having a slightly different size container makes all measurements funky looking and I don't let me begin telling you how messy it was for me using spray fabric glue!! LOL!! Anything to do with iron-on or plain normal fabric glue is the way to go for me now onwards.... 

Now back to the house. It was a bit plain looking at first with the normal features like doors and windows. So I decided that a house should have some flowers and greenery for it to look homey. But in the end I'd have to admit that judging from all the houses during NNC's get together, mine was wonky looking by the time it reached Malaysia with the parcel being squashed and torn beyond recognition!! Sigh... I guess I'd have to make up for this to the person who receive from me the next time I go back.

The next time I make anything to be sent via mail back home, I'll make sure it is just FLAT, light and can be put together easily. AND I'll pay extra for one of the Swiss Post mailing boxes at the post office. It is BRIGHT YELLOW in colour and very, VERY sturdy. 

OK, now the book marks. I made these for Margaret. Both are done in cross stitch, with HAPPINESS in Aida and CUPCAKE on even weave. 

The HAPPINESS pattern I got from The Making Spot . I love this site!! Free charts and even if it is paid, it is still very affordable. This bookmark is actually magnetised  Saw this method on line, found it rather interesting and thought of giving it a go. I just hope that it works like it supposed to work. 

As for the CUPCAKE, it is from Péché de Gourmandise à Broder  book I picked up from Aiguille en Fête expo in Paris a few years ago. This is the first time I'm using it and I finish it using my logic way instead of following the instructions on the book. 

Most French cross stitch pattern books are not well known to have very good margin of error for finishing. Found that out the hard way. Was nearly in tears when it was 80% finished and I just can't seem to finish the darn thing like it should be. Had to clam myself down and redo the WHOLE thing again the next day. Fun times.... :p   

Can't wait for the next year's bookmark/anniversary gift exchange and also for the next anniversary challenge! :D

Sunday, February 03, 2013

Revisited - Pulled apart cinnamon pumpkin bread

WOW! It has been a LOOONNNGGGG while since I've updated anything here. Oh well, life got pretty busy on the home front these past year. My youngest is already 2 and half (the monster years) and the oldest 5 and 7 months. Big boys now. Sigh...

OK. This post is dedicated to a a new found friend, Louisa in Vancouver. Some of you would have remembered I made this during one of my many weekend baking spree. Well the original post - Sunny Side Up  was kinda difficult for me to understand; English isn't one of my 1st languages, therefore I need to fully understand the whole process virtually in my head. Well in fact, on some sewing tutorials it is the same as well. So I love it when a tutorial be is sewing, baking etc comes in series of photos to show the steps! I know, it is difficult to actually do this but to those who actually did it, BRAVO! 

Here I am just going to share the STEPS I took and what I did but NOT the recipe. Please refer Sunny Side Up for the list of ingredients that you need to make this bread. 

Yummy puree with warm milk & butter mixture.
Now you've all gathered your list of ingredients. The first part of the recipe details that you need to "proof" the yeast (essential little critter for bread making). What I did was melt and brown the butter, then warm the milk BUT I did NOT "proof" the yeast as instructed. Mine I just pour it direct into the flour, with my pumpkin puree, sugar and salt. 

Dough BEFORE double in size
Then I knead and knead until the dough comes out smooth, elastic and slightly sticky. I did had to add in flour 1 tablespoon at a time as I suspected there's too much water in the puree. Then I kept the dough in a lightly oiled container with a clean towel in my rather warm kitchen for about 60 minutes until it doubles in size. 

While waiting for it to double in size, you can put together the cinnamon sugar mix and grease the loaf pan. I used my silicone loaf pan for this, so no greasing needed. :) 

So now here's the "fun" part, where I was sort of stuck reading it a few times until I think I get it right. 

First you punch down the dough and flip it out on a floured surface. You then roll the dough out into a rectangle with about 1/4 inch (0.5cm) thick and about 20x12 inch (50x30cm) in size. 

Press down really well! 
Then you sprinkle the cinnamon sugar mix evenly and press down with the palm of your hands. 
Cut into strips like so.

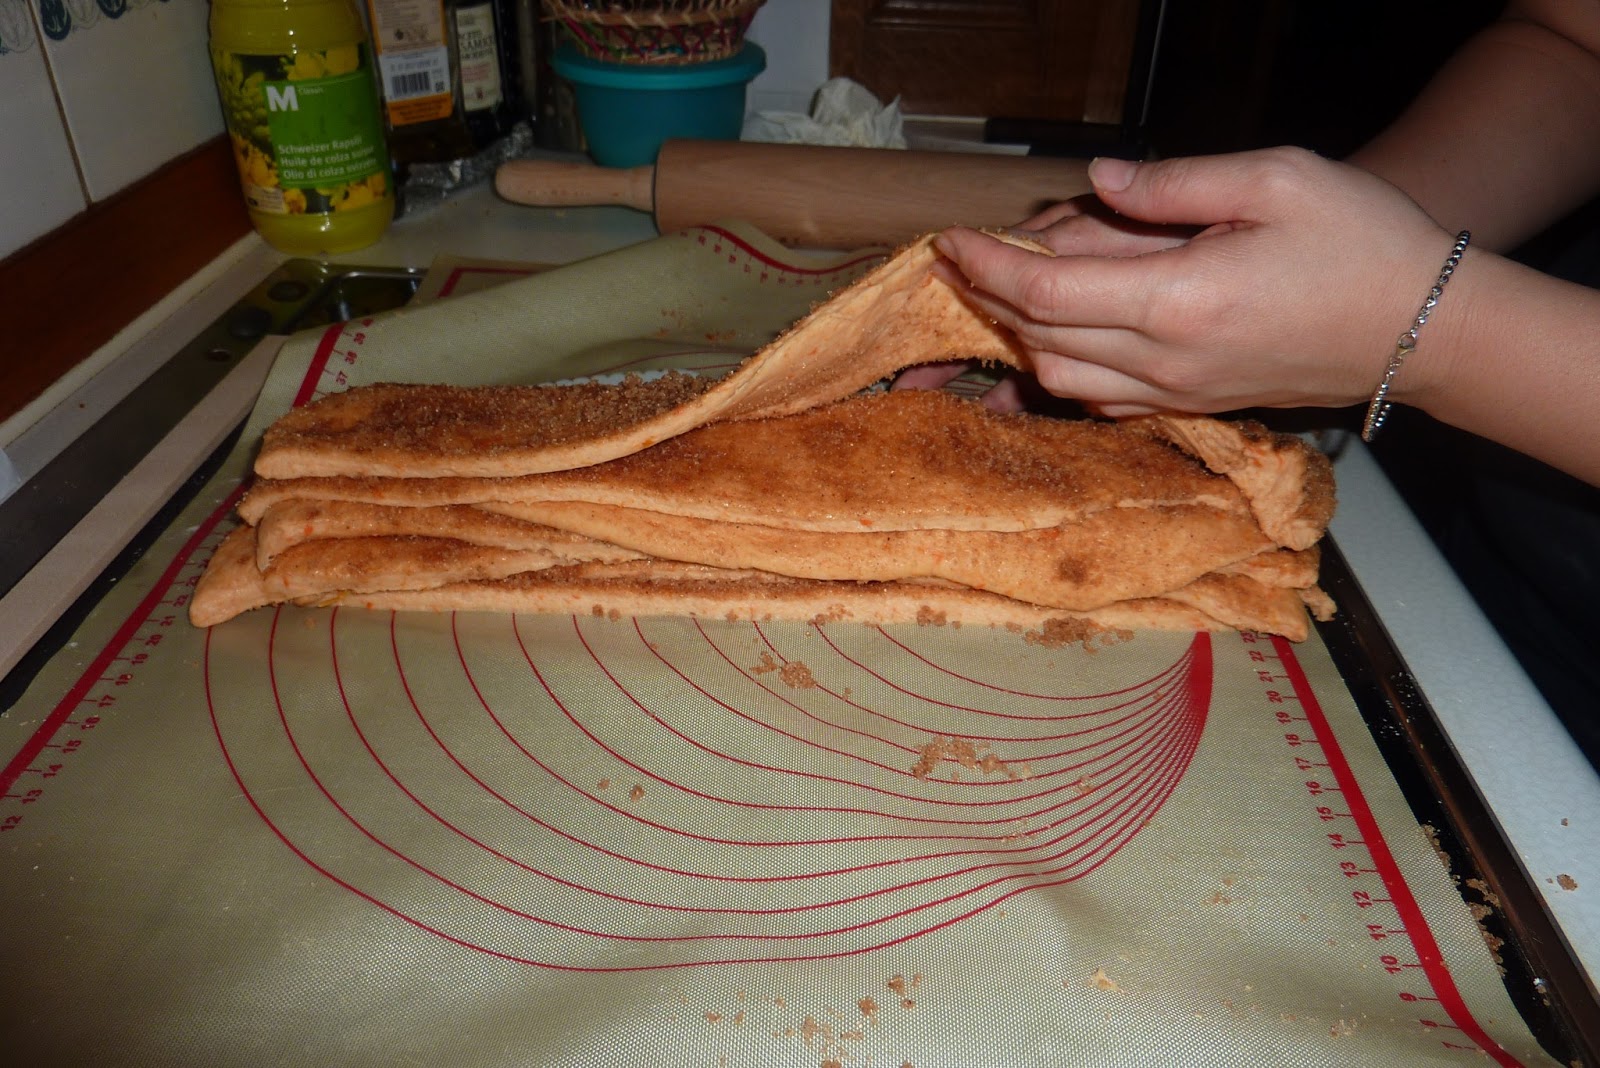
Using a plastic knife/cake cutter etc, cut 6 even strips on the rectangle and then stack them up on top of each other. 

Stack the strips up! 


Cut like so.

Now you have a 6 tier dough, you then cut the dough into 6 even squares. 

Stack like so... 

Notice the not so child free evidence?
Now, get your prepared loaf pan and sort of stack the squares on top of each other but horizontally - like you would arrange books vertically on bookshelves. Get the drift? 

All risen and ready to bake! ;) 
Then cover the pan with the clean towel and let raise for about 30-45 minutes while you pre-heat the oven at 175°C (350°F). Bake the bread for about 30-40 minutes until deep golden brown. I baked mine about 50 minutes. Every oven works differently and plus if you use silicone pan, it takes a little bit longer than steel ones. 

My bread right after its done baking! :) 

I highly recommend that you make the glaze AFTER the bread is done and is cooling down. I made mine with half the sugar as stated in the recipe and I used brown sugar instead of white sugar. The choice is yours if you want it very sweet or less sweet.

My "helper"? More like my little kitchen busybody! LOL! 
As I have a very limited work space on my kitchen counter - if you can call 20 inch work space, between the sink and the ceramic heating element, I had to work ON top of the heating element! Hahaha.... Notice the silicone baking sheet I put on top? Yep, that's my work top. :p On my first time baking this, I worked on the floor, which was vacuumed, moped and child free mind you! My kitchen nowadays aren't child free... Sigh... 

Sunday, June 03, 2012

Strawberry cupcakes

Fresh from the oven! :) 
These are so yummy!! And not to mention spot on the season too! Remember when I bought kilos of strawberries before? I should have made them into cake but then again we LOVE strawberry popsicles as well... I mean what better way to cool off on after school in a very HOT afternoon? 

As we were having BBQ (one of the first for the season. YAY!) by the lakeside with friends on Friday, and I was sort of got in charged of thanks to hubs (evil stare at him) I figured that this would be a time to try something new rather than have good old strawberry tart every time.... 

The not so pink insides... 
My batter turns out pink (YAY!) but once its baked the insides wasn't as pink! :(( But that's what you get when you're using all natural ingredients. This recipe is using all natural strawberries and no colourings! Kinda cool as its THE season for it. They tastes HEAVENLY!!! My kitchen even smells good with the lingering strawberry smell from the oven.... YUMMMMM.... 

But the next time I'm baking this again, I'd cut down on the sugars as I find it a bit too sweet and I'd up the puree by 1 cup instead of using just 3/4 cup for the extra moist. This time it turned out not bad but a bit dry  when we put then overnight. I would make this again but I'd try using other berries! :)) 

Here's the recipe: Fresh Strawberry Cake (cupcake)  


PS: I did the baking after dinner time so that explains the BAD pictures here. On the plus side, no kids to distract me and my kitchen still smells nice in the morning! BTW, I did not and can not for the LIFE of me ice my bake goods! Something to do with handling sticky sweet wet stuff that my brains  (and hands) didn't get! LOL!