Sunday, February 03, 2013

Revisited - Pulled apart cinnamon pumpkin bread

WOW! It has been a LOOONNNGGGG while since I've updated anything here. Oh well, life got pretty busy on the home front these past year. My youngest is already 2 and half (the monster years) and the oldest 5 and 7 months. Big boys now. Sigh...

OK. This post is dedicated to a a new found friend, Louisa in Vancouver. Some of you would have remembered I made this during one of my many weekend baking spree. Well the original post - Sunny Side Up  was kinda difficult for me to understand; English isn't one of my 1st languages, therefore I need to fully understand the whole process virtually in my head. Well in fact, on some sewing tutorials it is the same as well. So I love it when a tutorial be is sewing, baking etc comes in series of photos to show the steps! I know, it is difficult to actually do this but to those who actually did it, BRAVO! 

Here I am just going to share the STEPS I took and what I did but NOT the recipe. Please refer Sunny Side Up for the list of ingredients that you need to make this bread. 

Yummy puree with warm milk & butter mixture.
Now you've all gathered your list of ingredients. The first part of the recipe details that you need to "proof" the yeast (essential little critter for bread making). What I did was melt and brown the butter, then warm the milk BUT I did NOT "proof" the yeast as instructed. Mine I just pour it direct into the flour, with my pumpkin puree, sugar and salt. 

Dough BEFORE double in size
Then I knead and knead until the dough comes out smooth, elastic and slightly sticky. I did had to add in flour 1 tablespoon at a time as I suspected there's too much water in the puree. Then I kept the dough in a lightly oiled container with a clean towel in my rather warm kitchen for about 60 minutes until it doubles in size. 

While waiting for it to double in size, you can put together the cinnamon sugar mix and grease the loaf pan. I used my silicone loaf pan for this, so no greasing needed. :) 

So now here's the "fun" part, where I was sort of stuck reading it a few times until I think I get it right. 

First you punch down the dough and flip it out on a floured surface. You then roll the dough out into a rectangle with about 1/4 inch (0.5cm) thick and about 20x12 inch (50x30cm) in size. 

Press down really well! 
Then you sprinkle the cinnamon sugar mix evenly and press down with the palm of your hands. 
Cut into strips like so.

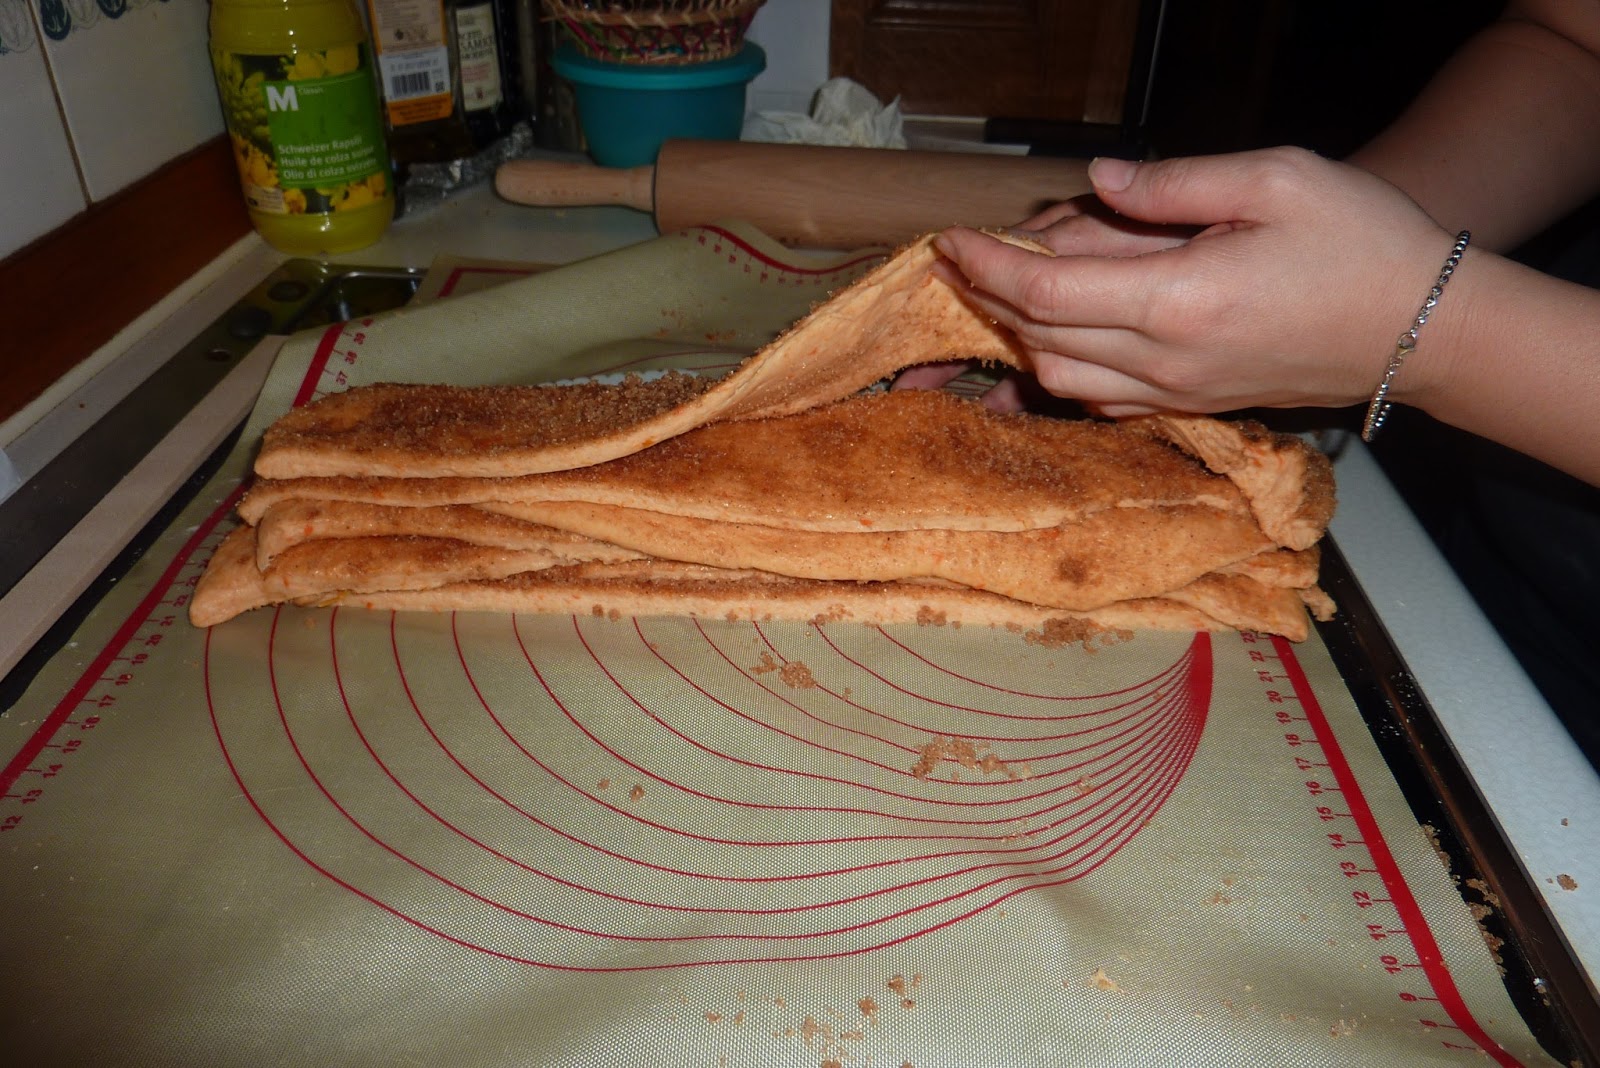
Using a plastic knife/cake cutter etc, cut 6 even strips on the rectangle and then stack them up on top of each other. 

Stack the strips up! 


Cut like so.

Now you have a 6 tier dough, you then cut the dough into 6 even squares. 

Stack like so... 

Notice the not so child free evidence?
Now, get your prepared loaf pan and sort of stack the squares on top of each other but horizontally - like you would arrange books vertically on bookshelves. Get the drift? 

All risen and ready to bake! ;) 
Then cover the pan with the clean towel and let raise for about 30-45 minutes while you pre-heat the oven at 175°C (350°F). Bake the bread for about 30-40 minutes until deep golden brown. I baked mine about 50 minutes. Every oven works differently and plus if you use silicone pan, it takes a little bit longer than steel ones. 

My bread right after its done baking! :) 

I highly recommend that you make the glaze AFTER the bread is done and is cooling down. I made mine with half the sugar as stated in the recipe and I used brown sugar instead of white sugar. The choice is yours if you want it very sweet or less sweet.

My "helper"? More like my little kitchen busybody! LOL! 
As I have a very limited work space on my kitchen counter - if you can call 20 inch work space, between the sink and the ceramic heating element, I had to work ON top of the heating element! Hahaha.... Notice the silicone baking sheet I put on top? Yep, that's my work top. :p On my first time baking this, I worked on the floor, which was vacuumed, moped and child free mind you! My kitchen nowadays aren't child free... Sigh... 

Sunday, June 03, 2012

Strawberry cupcakes

Fresh from the oven! :) 
These are so yummy!! And not to mention spot on the season too! Remember when I bought kilos of strawberries before? I should have made them into cake but then again we LOVE strawberry popsicles as well... I mean what better way to cool off on after school in a very HOT afternoon? 

As we were having BBQ (one of the first for the season. YAY!) by the lakeside with friends on Friday, and I was sort of got in charged of thanks to hubs (evil stare at him) I figured that this would be a time to try something new rather than have good old strawberry tart every time.... 

The not so pink insides... 
My batter turns out pink (YAY!) but once its baked the insides wasn't as pink! :(( But that's what you get when you're using all natural ingredients. This recipe is using all natural strawberries and no colourings! Kinda cool as its THE season for it. They tastes HEAVENLY!!! My kitchen even smells good with the lingering strawberry smell from the oven.... YUMMMMM.... 

But the next time I'm baking this again, I'd cut down on the sugars as I find it a bit too sweet and I'd up the puree by 1 cup instead of using just 3/4 cup for the extra moist. This time it turned out not bad but a bit dry  when we put then overnight. I would make this again but I'd try using other berries! :)) 

Here's the recipe: Fresh Strawberry Cake (cupcake)  


PS: I did the baking after dinner time so that explains the BAD pictures here. On the plus side, no kids to distract me and my kitchen still smells nice in the morning! BTW, I did not and can not for the LIFE of me ice my bake goods! Something to do with handling sticky sweet wet stuff that my brains  (and hands) didn't get! LOL! 

Wednesday, May 30, 2012

Some tote... :)

Front side of the bag

Made this tablet tote as a birthday gift for a friend last week. I took me awhile to browse on line at tutorials but I finally found one that I really like from Amy's Creative Side. The original tote doesn't have handles but I added them any way since she would want to carry them around. 
Back side of the bag

What I realised while making this tote is that not all tabs have the same dimension! Some like what my friend have is an ASUS Transformer Prime (such Optimus Prime name!!) bundle with a keyboard, means that I can not make this too snug as it will not fit both items at the same time - and may be any external hard drive if she wants to. So I made them a little wider on the depths about 1 1/2 inch to 2 inch. 
The chocolate and pinkish heart fleece.... 

As some of you might have noticed that the fabric is once again from Ikea. They have the most affordable canvas fabric around town. And some times with really nice designs as well. :) I didn't use batting this time as I was using fleece for the interior. I guess it'll be enough since even if I use batting with cotton fabric inside and out, it won't protect from the shock of dropping from high places. So let's hope that she doesn't drop it! :p

Pretty roses...  Don't they look real?? 
And I also made these felt flowers as part of the gift ribbon warp. I used light beige felt and dye it over using food dye! LOL! Can not afford textile dye for such small quantities and plus I still have some left over (waaayyyyy over use by date!) liquid food dye. I really liked how this turn out as we know roses comes in all sorts of colours now and even sizes! :) 

The 3rd still wet flower... :p 

I followed this tutorial from One Star Away. She has picture loaded tutorial here. So its pretty easy to follow! I didn't  forgot to get a picture of the whole ensemble: all warped up and ready to go. It was really pretty with rick rack ribbon tied around and the roses in the middle (I glued a brooch cum alligator pin behind it) as we were running late for the party lunch. Oh well! I just hope that she gets to enjoy them as much as I enjoyed making it. 

Saturday, May 05, 2012

Postage Stamp Quilt SAL

I've joint a SAL with some gals of NNC. :) We're going to make a Postage Stamp Quilt. Its a make it at your own pace thing but it has to be finish before end of the year. I'm aiming to get this done for winter. :) I HOPE!!

I bought my jelly roll and 3 other fabrics online (as usual) and it was an anxious wait for it as we're suppose to start on the 1st of May. Guess what? My fabrics did arrive on the 1st of May! LOL! Talk about perfect timing...
The colourful strips were cut by me and the rest were from
a jelly roll called Northcote by Cabbage and Roses for Moda.
I'm going to make a 60" x 80" rainbow quilt. This will be my 3rd time making a quilt. The first 2 quilt was a crib size for O and a nephew of ours. I began to cut strips out of the fabric I have on hand last Sunday evening. I was really worried about it having "hills" on the fold. But after following some really good advices from a couple of friends, the strips turn out really straight with no hills in sight! :)
So tonight I finally figure out how I want my blocks to lay but I still haven't figure out how to lay the colours out as I'm still missing at least 4 colours I wanted to incorporate into the quilt. I will be using the very IKEA-ish fabric I got in my stash - bought last year during a sale and for the "just because" reason. :) And now it comes in very handy! Will reveal when the time comes.

OH! Besides this quilt I'm planning to make another quilt for O. Remember this very generous gift from Diane of USA? It's a quilt pattern she bought some time back and recently decided not to make it and gave them to me. Fabrics and appliqué and all! My!! This pattern is called It's A Pirate's Life by The Country Quilter.

I'm am going to bite into this when I can. Just need to save up a little for the batting/wadding as I project that it could costs a bomb! :p Plus I still need to get some shiny fabric but I'm still not sure if this fabric could stand the tumble of the washing machine.... I just might have to get a substitute for it.

Wednesday, May 02, 2012

NNC Anni gifts!!!

I meant to blog about this earlier but somehow manage to get side tracked with the kids and currently building my own Postage Stamp Quilt blocks for SAL with a group of NNC ladies.. :p I'm so happy and glad to be surrounded by very wonderful like minded, talented and generous friends!!! :D
Don't you just love parcels in the A.M.? :)
JUST LOOK AT THE GOODIES!!! Its early Christmas for me... YAY!!!
So here it is, my gifts from Veronica, Malaysia, who is by the way one very talented little lady! :) She does cross stitching and also AMAZING sewing and embroidery work!! GOSH! Her gift to me is a tote bag with a little bird and the bag itself looks like a little cage... Very NICE! And she claim to be doing her first appliqué work!! 
My gift from Veronica.
Just look at the neat work!
OH! As for the bird, this is a super duper bird. Its a little pouch bag bird shape that she designed herself! How clever is that! And I'm now the very proud owner of this wonderful bird. :)

Avery talented Miss Veronica's pretty bird and not to forget wonderful gifts from  Madame Mel.
Check the bird here !
My photo taking skills are so.. limited! :((

OH!!! Not to mention the goodies that arrived in the same box!!! I was squealing in delight in the a.m. and nearly woke sleeping K! hehehehehe... And he can be such an Oscar (from Sesame Str.) in the morning or when ever he wakes up with loud sudden noise... :p  I was over the moon and felt rather spoilt by dear friends with these goodies. Only thing was I just wish I was there to experience the real gathering. Oh well. :) Perhaps next year?

MW actually made this after what I said on board about "that DARN BIRD!!" LOL!
Nice! :)
Now I wonder what will our dear headmistress of NNC come up with for next years challenge? I'm already thinking ahead now at the endless possibilities sewing and cross stitching item. And no, am NOT going to even give further hints after that 2 hints.

Monday, April 16, 2012

NNC Anniversary!

Happy Anniversary NNC! :) This year's anniversary meet was held at Mel's place. I personally wish I was there to enjoy all the good food and most importantly the good company of friends.

My gift exchange went to Radha! I hope you'll like it. :)
As with previous years, NNC's anni meet must have a challenge to those who want to join in for the gift exchange. This year is no exception. The challenge was the BIRD!! When I first read about it, I was like "WHAT?!? A BIRD??? OF ALL THINGS WHY A BIRD???" LOL! That was our initial shock when members found out that we have to make a bird shape of anything (or call it mix media if you will) to go with our handmade gift.
My very simple bird with pin " magnetic collecting" base. :)

Ply wood base with magnets attached.
So after weeks and days of brain racking and denial, I finally made that darn thing! LOL! It was really, really simple type of bird. I was at first thinking of making a peacock bird using some of my peacock feathers as tails but found out that yours truly isn't that creative to fit that thing into a box and have it mailed out safe and sound WITHOUT having some sort of accidents happening to it....  Over ambitious I am. :p
My handmade mug rug and tea wallet. I FMQ a bird design on it.

The otherside of the mug rug.

So I finally came up with the idea of reusing ice-cream box lid which I saved (I hoard empty yogurt & ice-cream containers) for something else. Made my simple bird, styled the lid to fit in magnets (was really glad to have come across really small cylinder ones) with some glue, sawed a piece of ply wood and glue it underneth so that the lid is heavier. I even made the "nest" out of FIMO clay so that the bird "stands". I forgot how much fun it was playing with modeling clay... :)
Some of my snappy purse.

When opened up...

This year, I also made some contributions towards the goodie bag. Made a small snappy foldable purse (tutorial from here) by Rashida Coleman-Hale. I tried it out the 1st time and it came out looking great! So I went ahead and made 20 of them! LOL! Yeah, tell me about "production line" à la a pair of hands! Just thank goodness I finally made the 20th purse in time to have it mailed out 3 weeks before.... Blindstitching 80 corners is hard work! LOL! So you people better enjoy it OR ELSE! LOL!

Wonder what's brewing for next year's challenge?

Sunday, April 08, 2012

My very own laptop cosy/slip!

My lappy cosy! Veiw from the front/top side.
Remember the Mac book cover I made for a girlfriend of mine who came sometime ago? Well I made my very own laptop cosy/slip. Mind you my laptop isn't spanking new, bought it AGES ago but haven't really though about making it a cosy or a cover.
View from the back/bottom.

For this slip, I'm using IKEA fabric again. This fabric was bought ages ago and its just one of the stash I just have to have. You know for the "you'll never know when I might need it" times? YUP! I'm a beginner level hoarder... LOL! Expert levels of hoarding needs lots of space and financial capabilities to reach.... :p
Open sesame!

Any way, the inside fabric use here is fleece or what we call here a tissue polaire. Its mainly made out of recycled PET so I'd say it environmentally friendly? Its my 1st time using this type of fabric and let me tell you, its such a "user friendly" fabric! No need to worry about fraying and there's really minimum shrinkage! :) But there's a hitch in this fabric, its really HELL to pay when you have to unpick or frog since you can't really see the almost hidden thread...

I love the pink hearts with chocolate base. Reminds me of chocolate cake with pink frosting!! :)
And since I'm in the mood to experiment, I made this slip with handles and also added Velcro on the top. Reasons being I could carry it easily and the Velcro because the top sides part refuses to close properly! LOL!
Tiny patch of Velcro here.

I'm now thinking of my next one, instead of making a button flap, I'll be making a Velcro flap that closes almost the entire opening part of the cover. And perhaps something to attach the AC wires/adaptor to the slip?

Monday, April 02, 2012

Mac book cover

Meant to blog about this earlier but was a bit tired to do so. Oh well! :) Was a little tied up some weeks ago with visits from my school friends, a gal who I've known since primary school and another gal from my SHMS days. :) Made a new friend as well with the travelling companion of my primary school friend. For which I'm glad to get to know.

So much has happened since I've left SHMS but I'm still glad to be able to keep in touch with friends or acquaintances up till now. Although friendships form from my SHMS days aren't long but I do believe that boarding school friends tend to be as close as if not closer than my own childhood friends. 
Can you spot the button? ;)

And for this friend of mine I made her a Mac Book Pro cover as a small gift. Well I actually intend to make this for her birthday last year but was so caught up with other stuff that I didn't get around making it! Plus I didn't know that she got herself a Mac Book. So.... ;)

I saw this tutorial long time ago but didn't get around making it.  So with this I present you this! LOL!

I kinda tweak the materials a bit here. Instead of flannel I use cotton (from IKEA!) and batting. Outer fabric are upholstery weight and lining light weight cotton.
Notice how IKEA-ish? LOL!

I didn't have flannel and I didn't wanna go out just to get it on a Saturday! Shops are a WAR ZONE on Saturdays that I avoid them if and when I can. Shopping that need to be done can be a very enjoyable thing to do, even to window shop, but this can only be achieved on weekdays minus Fridays.
Fits perfectly! :)

I really like this tutorial. In fact I really like photo tutorials! :) Nothing like a photo to actually see what one meant in a tutorial. I can never understand or even have the patience to read a print out of a tutorial when I'm actually in the process of making the said item. Its either I do not have the acquired language or I simply have no idea what the tutor is talking about... :p So power to photo tutorials! :D

And since I had to make sure that the batting stays put, guess what? I FMQ here! Well my 6th attempt anyway... I had to frog several times to get the tension and the stitch length right. I still have a long way to go, but hey it least this gave me a chance to try it out.

I'm going to make another one for my lappy. I went and got half a meter of a pretty printed fleece fabric - which costs me a bomb to get at our local brick & mortar! Grrr.... Man... And already I'm planning to get some jelly rolls. Guess that will have to wait for a little while. Sigh... OH WELL! The budget of a free labour stay at home mum is very tight: :(

Am planning to sew them up next week if possible and this time I'm going to use interfacing as well.

Tuesday, March 06, 2012

Guess...


I have been busy with these lately. Can you tell what it is? hehehehe... I'm NOT telling as its part of door gifts handmade for 2012 NNC Anniversary meet up. Even though I'll be missing it (I ALWAYS MISS IT!:((( ), I thought I'd make some items for this year's anni meet up since I was so touched by their generous nature whenever I go home for the holidays. Them giving me their precious time for a small meet up especially.

Will up date photos of this once everyone has got theirs on April! heheheehhe...

Monday, March 05, 2012

Gifts from Diane!

This is a a very late post. Gosh! I can't get my head around how fast time fly by when I'm putting together NNC goody bag goodies! LOL! I know I need to work faster but they say, a rush job is never a good job....

Diane's gift came all the way from South Carolina! She so generously gave me a quilt pattern and its coordinating fabrics!! I was over the moon when it arrived on the morning of the 22/02. Was going; OMG!OMG! OMG! and Owen was looking at me like I'm a crazy person... LOL!

LOVE GETTING PARCELS IN THE MORNINGS!! :D

Bags of fabric!

Har!

Appliqué pieces

THIS I will keep till the boys are a little older to use!
From the "Royal Desk of Her Majesty THE QUEEN"!!! LOL!
And since we have agreed earlier on about making this into an exchange, I am at the moment scouting for items that says SWITZERLAND! LOL! Found 2 or 3 items but will add more to that collection as time comes. And since US has strict food import guidelines, I don't think I'll be sending chocolates over. Sorry dear! It'll melt by the time it gets to you..... May be next time if I ever plan to meet you State side, I'll bring some over? :)

Sunday, February 19, 2012

Weekend baking spree....

OMG!! I didn't realised that I can actually miss baking goodies! LOL! The last time I baked was for Chinese New Year and then after that nothing... But that's good to, for the sake of our waistlines. :p

On Saturday morning I made this...
My pulled-apart cinnamon sugar pumpkin bread. Recipe here.
Its my very first time making this type of bread, besides croissants but that's another story for next time. ;) And its also my first time using a dough hook on my hand mixer. BTW, I got myself a brand new hand mixer during the winter sale period. :) I've never tried using the dough hook before and let me tell you its all worth it! Kneading bread by hand is tiring work... :p

Before leaving it to raise again and popping it into the oven....

The final result: really moist, soft, sweet and a DELICE! :)

And since I do not have enough space on my kitchen work top, I had to work on the floor with my silicone baking mat. :p Really feels like messaging the dough this way... hehehehe... The bread turned out wonderful despite the fact that I forgo the glaze seeing the amount of sugar I've added into the bread itself. Our whole apartment smelled of cinnamon sugar brioche when it was in the oven! :)))))

Seeing that I still have some of the cinnamon sugar mix  and 1/2 cup of pumpkin puree left over from the bread, I made pancakes the next day as a special treat for hubs birthday. :))) Sorry, no photos to show off as it was gone by the time I finish making them... :p

A heart for hubby and daddy dearest! :)
The sides...

The insides. A little undercook to me...

And to top off the day for hub's birthday, I experiment with a recipe from a blogger friend, Thanis Lim: Chocolate Cheesecake Swirl Brownie. The above is the final result. It wasn't a difficult recipe to follow just that since taste is objective, I find that I can taste the sugar (brownies ARE ALWAYS sweet! But we can make it a little less sweet no?) but not so much of the chocolate. Although hubs like this I find it a little under cook to me.
"My version" of chocolate cheesecake swirl brownie.. hehehehehe...

And since I've already planned to bake another brownie batch for hubs to share with his colleague, I used this recipe instead but mixed in the cream cheese mixture. I omitted the white and milk chocolate and used our local "brown" sugar found in Migros (popular local supermarket chain). Its called crude cane sugar and it has pale brownish colour which when poured into hot mixtures or being boiled/cooked, gives a very nice rich medium to dark brown colour. The plus side is that its not as sweet as white sugar, which is made mainly from sweet beetroot. :)

So that has filled out my dessert baking quota for the month. :) Don't think I'll bake again until at least till mid or end of March. Unless of course we're invited to other people's place for a party! :D