Saturday, August 27, 2016

New Clothing

So to show "love" towards it, what more to make new clothing or cover to protect it? 
I just LOVE my Kindle. I received this lovely e-reader from hubs as a Christmas gift. Looking at the WWW, there are so many tutorials and ideas for Kindle, Kobo etc e-reader cover. One of the first cover I made was the one with a zipper closure. That tutorial was very clear but some how it did not turn out as great. I was having plenty of zipper issues and did not zip up!! To top that, it has a wavy look on the finished product. I just gave up on that tutorial and after frogging/sewing twice. I had to use the ugly thing of course. Why not if its just for temporary reasons until I find another tutorial.

One of the first cover I made

Notice the zipper and the wonky finishing? Yeahh....
And so after a year of using that cover, I chanced upon another one. This time it is using elastics to keep it together and with a pocket. I though YAY! Finally something that is not too difficult to follow and try to make it. BIG MISTAKE! 


While the tutorial did not mention which fabric to use, I went ahead using my scrap upholstery weight fabric from where else? IKEA. LOVE that place! Now she did mention using interfacing for all fabric pieces, I only use for the pocket piece which is also holding the Kindle on the front. That plus interfacing the one side of the cover. Keep in mind that I'm using upholstery weight fabric, which is a little heavier than quilting cotton. 

Just no words for this.... SIGH.... 
I did not think much of it and just starting to sew and finishing it. As I was about to turn it right side out, the corners just will not turn out! Imagine sweating it out with a small Kindle cover, trying out get the them right side out. Seems really funny to me now but it was really annoying then. I did reduce the bulk, by snipping the corners and overhanging edge as mentioned in the tutorial. Little did I think it had to do with the fabric weight and amount of interfacing being used. 

A snug pocket to hold it in. 
So angry to have to frog. I did it just for the batting. Hey! Those stuff can get expensive where we're living now. I ended up making another one following the measurements BUT this time using half upholstery, half quilting cotton AND only 1 piece of interfacing to stiffen the pocket/Kindle holder piece. After finishing the main parts sewing, this time I'm able turn it right ride out. Oouufffff....I had to iron it like a mad women after just to get it FLAT!

The gap! YIKES! 
As I fit my Kindle into it, it still does not seem right. It is a little large at the corners! AARRGGHHH.... Only then did it occurred to me that the lady did not include measurements of her Kindle just so that later versions or other styles of Kindle are able to fit in it. 

Will I make another finally FIT my Kindle? I hope so. I'm not too keen on the corner of tutorial 2 and the overall bulk. I really like the pocket idea. Tutorial 1 is just a disaster in the finishing but the holder is just super fit. Perhaps I can come up with one that is both easy and practical to make. For now I'm just going to use the one I just made. 


Saturday, April 30, 2016

Street Food Festival - Lausanne

After all the hype of our local supermarket group COOP about this Street Food festival for several weeks, we decide to check it out today. This festival started last night and its in Lausanne Beaulieu; the only expo hall or area big enough in the big town area to hold any events. 
Air Stream Corn Dog! :) 
This if I am not mistaken is the 2nd edition since the 1st time they kicked off this event in 2015. Plus it was in 2015 that it finally came to Lausanne after having successful event in the German speaking part of Switzerland. 
The boys' very first taste... 
We missed the one last year and decide that this time, we didn't want to miss it again come rain or sun shine. It was POURING; OK not as bad but still it was raining and it was cold. We reached main event area at 5:30pm. It was not surprising for us that there were not many people as one: it was obviously early  for dinner and two: there was the uncooperative weather to boot. 
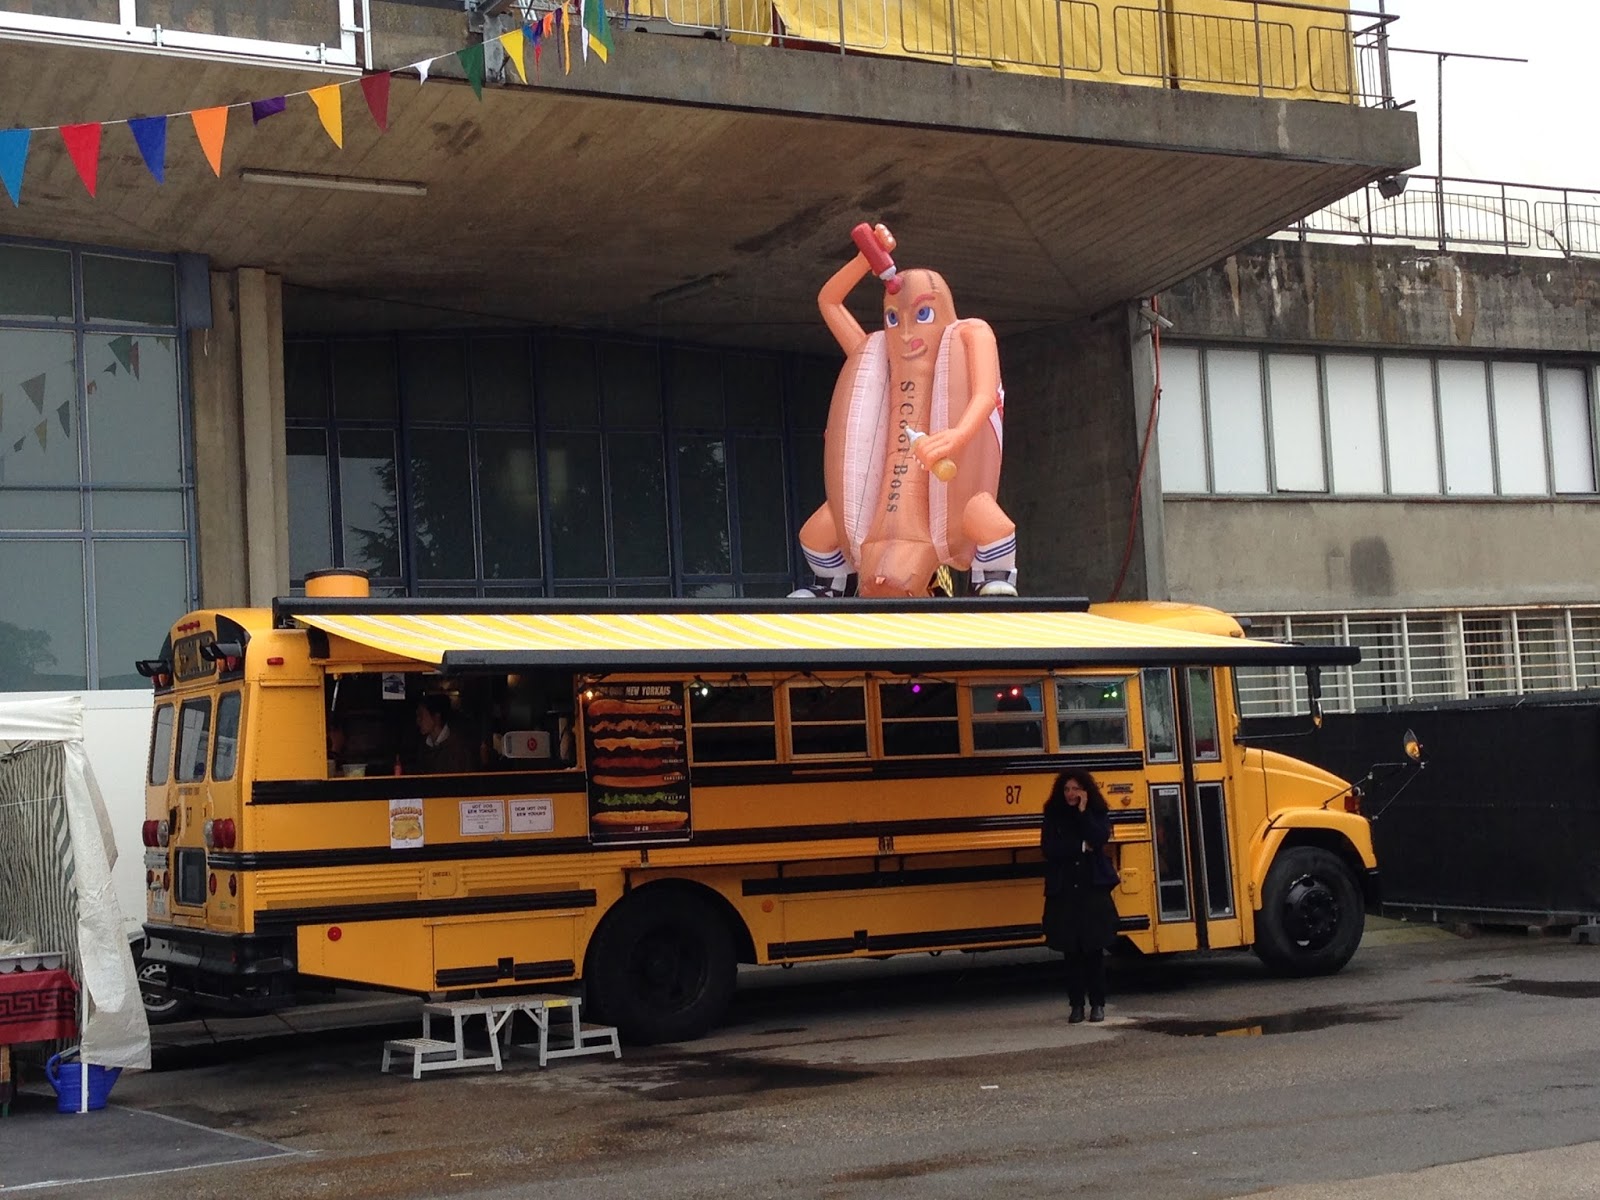
The yellow school bus NYC style hot dog. PS: that hot dog thingy on top of the bus is just WEIRD... :p
We took a walk about to check out the food stand or trucks. There were many choices and at least 2 handful representing traditional food from countries like Vietnam, Japan, Peru, Mexican, Brazil, Argentina to name a few. I was a little disappointed to read some menus in written German. Although I understand that some of them come all the way from German part, they do make an extra effort to speak French and English. Very much appreciated gesture. 


After walking around, we saw a CORN DOG food truck. Now this food truck is so VERY RETRO! Its an Air Stream mobile home converted into a food truck. That is pure advertising for sure and the fellow was super nice. The boys had their very first corn dog today! :) 
Happy boys with their curry wurst. 
Then we ate some quesadillas, hot dogs, freshly made potato crips and hamburgers. We wanted, well I wanted to get other food (Peruvian and may be that skewer of meat with veggies) but was a little but stuffed after the churros.... LOL... Food was really good. There were stands for flamen kuchen tart (GOSH!!), a smoothie WV mobile (also very cool), Satay and a very cool Yellow School Bus selling NYC style hot dog! I should NOT have had that bowl of curry laksa for lunch! aggrrrhhh... 
Cider sample. Very nice and fruity taste but was slightly strong for hubs the designated driver! 
As far s prices goes, its pretty much event prices one can expect. Well they have to charge such prices due to the fact that vendors had to fork out quite a bit of money for the entire weekend. All in all a very good event to go to for next time. My complaint was the cold & rainy weather AND that there were too many stands selling sausages and hamburgers! hahaha... I really wonder if event organisers ever step into  Asian night market selling street food? They will have to take several note book and a good camera along for the experience! ;) 
Empanadas! 
I am also looking foward to go to another food event in May: the Lausanne Food Truck Festival on 15 & 16 of May. It will be public holiday, PentecĂ´te long weekend in Switzerland. Place will be Places de la Riponne and de la Palud. 


Sunday, March 27, 2016

Leg of lamb tajine with prunes and almonds

Final product...
Easter weekend. What to make for dinner on a long holiday weekend and its raining outside? Something soupy and that warms up the body for sure. For some it may be comfort food like the Cottage Pie with Cheesy mashed potatoes or that warm but quick pho or that spicy and hot Nyonya curry noodles. I swear by these recipes. As I don't eat beef nor veal, I tend to substitute with either chicken or pork or lamb. 
Slightly browned onions...
For this holiday weekend, almost everyone swears by lamb or fish. Well we had fish on Wednesday and Thursday this week; that filled our fish quota for the week. And since lamb was on sale, why not. 
The browning of the lambs...
I first helped to cook this recipe with several mummy friends. We normally have this cooking session meet up during the winter months, at least once during the season. We made so much that it became lunch the next day for hubs and me. I was pleasantly surprised that O enjoyed this and he even suggested that I add in some chick peas next time. K was not that into this dish. 
Almost clean pan after heating some water to get more goodness out of it.

Plum prunes in black tea. 

This is a translated recipe from a French recipe site called marmiton.org. The site is in French only and has really to go to recipes. I try my best in translating this and also add some pointers as to how I'd make this dish. Please feel free to click on the title below to go to the original recipe in French! :) 

Ingredients
  • 500g dried and pitted prunes
  • black tea (I make this from 5 teaspoon of loose Ceylon tea leaves with 700ml hot water)
  • 500g onions roughly chopped
  • some olive oil
  • 1.5kg leg of lamb in bite sized pieces (preferably without bones and as less fat as possible)
  • 2 cloves garlic
  • 1/2 tsp of cinnamon powder (or half a stick of whole cinnamon stick)
  • 1/2 tsp of  ginger powder (or grated fresh ginger - about 1 tsp) 
  • 1 scoop of saffron powder (or about 5-10 saffron pistils) 
  • some crushed coriander seeds (about 1/2 tsp)
  • 100g blanch almonds
  • 3 tbsp of honey
  • Salt and pepper to taste
  • enough water to cover meat
Method
  1. Soak dried prunes in black tea.
  2. fry the chopped onions in some olive oil until slightly translucent. Take out the onions and transfer them into a casserole pot. 
  3. In the same pan, brown your lamb pieces. The idea is to give them some colour and some say to seal in the good stuff. Do this in batches as it will be easier to brown. Transfer these into the same casserole pot. 
  4. Add in your cinnamon, ginger, garlic and saffron. You may also add roughly chopped carrots. 
  5.  Then pour in some water, until just enough to cover your meat. Turn on the heat to high until boiling and then to low to simmer for about 1 hour with the lid on. I normally pour some water into the still hot pan that I used to brown the meat to sort of "clean it" and bring the caramelised meat "leftovers" into the casserole pot.. 
  6. Once 1 hour is up, drain the soaked prunes and add them into the casserole. Continue to simmer for another 20 mins. Try drinking the tea from the soaked prunes. Very delicious! 
  7. Mean while, toast the blanched almonds in some butter and add these into the casserole with the 3 tbsp of honey. 
  8. Continue to simmer for another 5 mins with the lid off. Make final taste adjustments and it is ready to serve with couscous. 
Run out of blanched almonds, figured that non blanched ones will not make a lot difference...
I might make this again but will replace lamb with chicken tights. Someone in our household will go hungry just because he doesn't like lamb smell... :p I think eating lamb or even beef needs an acquired taste buds. Just like eating bitter gourd or coriander leaves. 


Baked custard bun - the ALMOST epic fail...

Freshly baked and ready to eat! :) 

I recently ate this in a restaurant about 2 weeks ago with some friends. It wasn't baked but steamed variety. I really liked it but there was something missing. I've had this type of bun before back home and this time around it did not quite meet my choosy tongue/taste buds' expectation. And sure enough I though to myself why not make the bake version instead of the steamed one just to try. 

The custard consistency you'll need. Looks like custard dough! :p
Flatten dough

So off I went looking around WWW for the baked recipe. I finally found one here and think to myself looks easy enough. As I was going through the recipe, I realised that the person who wrote this must be of Asian origins. Don't get my wrong, there are lots of Asian people out there with strong English command blogging like your typical ang moh. The reason why I suspected it its because of the way it was written. 
These looks huge rather than your typical teaspoon sized. 

Ready for baking! 

I got really confused at one point having to guess (teka-teki time bah) what is she trying to express. On top of that there wasn't any photos posted as to explain how the recipe should look like once it was mixed in or cooked or wrapped up... 
Fresh from the oven. My whole wheat custard baked buns. :)

One reasons why I would not even read through a sewing tutorial if there is no photo as to show or even inform stupid people like me how the item should look like each step or every important step. Oh the perils of trying to follow a recipe or sewing tutorials on line.  

If anyone is interested in this recipe, please follow the ingredients as per link here but here is the method my version. 

For the Custard
  1. Warm milk in a small pot over low heat. The milk should be just warm not hot. 
  2. Mix your flours and sugar together in a bowl. 
  3. Beat the egg yolks until pale in colour and almost double in volume. Add in the sugar flour mixture while stirring it; you switch off your mixer and stir it. Otherwise you'll get flying sugar flour everywhere. 
  4. You then pour your warm milk in slowly while mixing it with your mixer switched on, on low please. Please retain your small pot for step 6. 
  5. Once it is well blended, add in your butter and vanilla. 
  6. Now you transfer the custard mixture into the small milk pot, using low heat to cook the mixture until its very thick* while constantly stirring it. This is to avoid the bottom being burnt and also mixture curdling too fast. Otherwise you can always use double boil method. * Thick as in you can spoon it and roll it consistency. 
  7. Once the thickness consistency is achieved, switch off the heat and transfer it into a bowl. Cool the custard down before chilling it for an hour or so in the fridge. 
For the bun
  1. While the custard is "chillaxing" in the fridge, mix everything except for the butter and olive oil to create the dough. 
  2. Add in your butter. Knead the dough until it has an elastic feel.  
  3. You then pour in olive oil but do not mix it. Just rub it around the dough. Cover your dough and leave in a warm room to poof for about an hour or until double in size. 
  4. Punch down the dough and make 15 rolls. 
  5. Make the same amount of chilled custard filling, a teaspoonful for each ball. 
  6. Flatten the dough rolls with your palm, insert your custard filling and warp them up. Roll them as best as you can, make sure that there is no holes. Otherwise you'll get leaky buns. 
  7. Arrange the buns on a parchment lined tray, cover them with cling film and let them poof again for an hour. I used my brownie tray for this. 
  8. Preheat your oven at 200°C. Using a mixture of 1/2 egg (the rest from the bun recipe), 1 tbsp of water and 1 tbsp of milk, you egg wash your buns. Bake your buns for 15 mins. 
SIDE NOTES
  1. As I am using whole wheat flour for this recipe, I used 1 1/4 tsp of yeast instead of 1 tsp. 
  2. Please make sure your butter is at room temperature as it will incorporate really well and quickly into the dough. 
  3. Also since my kitchen is not as warm as in say any typical SEA homes, I normally poof my bread dough in a warm oven! LOL... Works for me. Warm your oven at 100°C for about 15 mins, switch it off and wait for 10 mins BEFORE putting your dough in a covered bowl to poof as per recipe. Best to use stainless steel bowls for this. 
  4. As I am using vanilla paste as opposed to vanilla extract. Yes I am such a snob in this! :p Between extract and paste, I prefer the paste as it brings out the real vanilla flavour. With extract not so much and you'd have to use much more than paste or beans. Plus I really like the tiny tiny flakes of vanilla in my baked goods. 
  5. This custard recipe will yield you more custard filling than dough. I might have to make more dough tomorrow to finish off the custard filling on hand. Perhaps using all purpose flour this time. 


Tuesday, March 22, 2016

Keep on hopping...

Some Bunny  
Here's a really cute bunny by Some Bunny DMC hopping its way to down under. Its a commission by a friend for a new born. I've stitched this for my boys, niece and nephew as a birth sampler before. The charts are really simple and really cute. The chart originally was in a kit and as with kits, once all threads are gone, it was time for replacements. 

This gave me a chance to get plastic containers for my floss and organise it as I should have in the first place. For the moment they are arranged by numbers and in zip lock bags. Later I'm planning on making a spread sheet to sort of take stock of what floss I own, what I'm running on low and what I don't have. Hopefully with this method I'll avoid buying extra of what I have tons of. :)
Little House Needleworks
As I was re-arranging my floss containers, I got to unearth 2 of my finished XS work that is still unframed. One of them is Home of a Needleworker by Little House Needleworks, a SAL with ladies of NNC (a stitching group I'm in). I truly enjoy SAL when its a small to medium size projects. Big ones is really overwhelming. The other one is The Time I Spend Stitching by Dragon Dreams. done with speciality stitches and with metallic floss. 

Dragon Dreams chart
This is one mistake most of us do; be too ambitious and go start a big project when we are starting on XS. Mind you, yours truly here has big a** UFOs. Silly me was thinking, yeah I'll have plenty of time when the boys are small etc etc...YEAH RIGHT! Still hasn't happened, the extra time. LOL... One of the projects is a9 Koi Carp by DMC. UFO since late 2007.... :p I think its high time to take action in attacking it slowly but surely. One UFO at a time.


Monday, February 08, 2016

Gong Xi Fa Cai!!!!


Today is the first day of the year of the Monkey. How quick time passes us by. It seems like only weeks before we were celebrating the year of the Goat and also hub's 40th birthday on the same date in 2015! :) 

I am glad to be able to still celebrate Chinese New Year with my own little family, despite the fact that other family members are far away from where we are living now. The world has gotten a little smaller with the advance technology which enables us to connect with our loved ones via Internet phone or video phone. I still remember when I actually had to buy calling cards to call home! It was rather expensive then and being a student, I had to really tighten my phone card purchases. :) 
Bak kwa or bbq dried pork

This year I wanted to try make bak kwa or bbq dried pork. I've seen bak kwa tutorials YouTube videos and also read some cooking blogs on this but never had the guts to make them . :) So this time I saw a friend on FB posted a good recipe for this and she actually tried it, I decided to make it. I mean why not, since we can't get those here. Even if we can, with the current uncertainty of food safety issues, I can never be sure how fresh or good the raw meat is. At least if I can make it at home with easily sourced items, why not? Here is the recipe I used. There is even a video tutorial with written recipe in English and Mandarin.  

For this year's celebration, I made pineapple tart, peanut cookies and almond cookies. The last two cookies are pretty easy to make. I found this really good recipe from Bread et Butter: Peanut cookies and almond cookies with a crunch. As my family love them, so I stick with it. As for the pineapple tart, I got the recipe from Table for 2 or More. She has tried and tested so many good recipes for her family. I am happy just to browse and look through all her cooking adventures. Give me idea as to the million dollar question SAHMs or SAHDs asks all the time: What to cook for lunch or dinner?!? hehehe... 

So here is wishing everyone a Happy and Prosperous New Year. May you and yours be blessed with good health, joy, wealth and all wishes come true!! GONG XI GONG XI! 


Wednesday, January 20, 2016

Silky (sort of) beancurd desert: Tau fu fah


Honey its cold outside.....
 This is one sweet desert I have been trying to make since last year. I can never find the main coagulant ingredient here. But ever since I got GDL from home, well more like importing it in, I was itching to try it out. As usual life happens and I never could find the time to make my own soy milk until last Sunday, when its starting to snow and it was near freezing. To top it off, I was craving for this desert! :) 

Bacon wrapped scramble eggs topped with chives & *sheet of brick

I found several TFF recipe but they are always in Chinese or using gypsum powder (the food grade one mind you, not plaster of paris). And as most of them are imported from China, I get very vary of Mainland products ever since the milk powder scandal. I finally found this blog by WendyinKK @Table for 2 or More. I was over the moon when mine FINALLY SET after anxiously waiting for it. OK, not that anxious-lah! We went out for a walk (a long walk) once it kinda stop snowing outside for a while. 
First edible TFF! :D 

I've made my own soy milk for many times using my soy milk maker. But this time I decided to forgo using the maker as its rather troublesome. It can only load about 50g of soaked soy beans at a time. As I am a major pain in the a** about cleaning my electrical appliances, I need to clean it out. Blame it on my OCD. :p 

I like it with palm and ginger syrup. Yummy! 
I have to admit, my TFF was not as smooth looking as hers is. Perhaps I did not grind the beans as it should. I was using my Moulinex blender and cloth strainer to get the job done. I will try again next time, perhaps using coffee filter and when I find the motivation to skin all those soaked beans. :p I find that removing the outer shell of the beans makes soy milk tastes better. 

*Sheet of brick is feuille de brick in French. It is similar to popiah skin BUT its not the same. They are slightly thicker in texture. It will get crunchy in the oven minus the use of oil. BUT they will burn easily if oven temperature is too high or you leave them in for too long. They come in each sheet separated by some sort of waxed paper. Which makes my life easier when it comes down to peeling off each sheet without holes or tears compare to popiah skin! :) 

Thursday, January 14, 2016

In the works

Happy January 2016! My first post for the year, albeit a little late but better than never. :) So for this first blog post of the year, I've decided to continue to my cross stitch piece. I started this mid December 2015. Got this idea of actually making a fabric cover for my sewing machine. I figured that having just a plain cover can be easy and fast to make, but have I ever taken the easy route to making anything? So far NO! LOL.... 

Drafted the chart pattern after having browse through the WWW for the right image (copy right free) and letters for several hours when the kids were in school. Best time to do get things done during the day time. ;) I am not at liberty to reveal the whole piece yet. So for now its just a really small part I am willing to show. 
Using the lovely DMC Colour Variations# 4025.  

As of right now I've drafted the pattern out for the cover but I have yet to cut anything out until I am 100% sure I've got the calculations correct. Novelty print fabrics are hard to find here in the Land of Moos, not to mention mighty expensive! Reasons why I "import" them via online shops, when I am back at my parents' place or other relatives'.

Speaking of which, I'm on a forced stash diet for the moment until I can sort of "thin it out". :p Its horrible but its a necessary evil. Let's see how long I can stand it this year. Can not promise that I might not break the diet.